Virtual
Photography
 Since I don't have access to a reference library right now it may be unwise to quote
Sir William Cornelius Van Horne. If the quote isn't precise, please feel free to
correct me.
Since I don't have access to a reference library right now it may be unwise to quote
Sir William Cornelius Van Horne. If the quote isn't precise, please feel free to
correct me.
Very shortly after the Canadian Pacific Railway was established Van Horne realized
the potential their route through the Rocky Mountains would have as a draw for
tourists and the subsequent revenue it could generate. He was quoted as saying
"If we can't export the scenery then we'll import the tourists". Now, 121
years later ( CPR was incorporated in 1883. ) we CAN export the scenery, virtually,
with the use of computer software.
 Various individuals and companies throughout the world have taken advantage of
Microsoft's Train Simulator ( MSTS ) program to produce add-ons and route
packs. One such enterprise is "Maple Leaf Tracks" which has produced a route
sold as "Kicking Horse Pass". Their route pack creates CPR's Laggan
Subdivision, or most of it, between Field, British Columbia, and Calgary, Alberta.
Located along this route are the "Big Hill" and the Spiral Tunnels known to
every Canadian railwayman, railfan, and model railroader. Maple Leaf Tracks has done
a good job representing this subdivision. Their software includes CPR locomotives and
appropriate trackside signs and structures found along the CPR
right-of-way.
Various individuals and companies throughout the world have taken advantage of
Microsoft's Train Simulator ( MSTS ) program to produce add-ons and route
packs. One such enterprise is "Maple Leaf Tracks" which has produced a route
sold as "Kicking Horse Pass". Their route pack creates CPR's Laggan
Subdivision, or most of it, between Field, British Columbia, and Calgary, Alberta.
Located along this route are the "Big Hill" and the Spiral Tunnels known to
every Canadian railwayman, railfan, and model railroader. Maple Leaf Tracks has done
a good job representing this subdivision. Their software includes CPR locomotives and
appropriate trackside signs and structures found along the CPR
right-of-way.
( Did you know that pressing the zero key while running MSTS displays the latitude and
longitude coordinates which may then be used in conjunction with mapping software to
physically locate that spot in the real world? Try it, it works.)
In addition to this, many other persons have created CPR rolling stock and
locomotives that may be downloaded from various internet web sites for free. Using
these three components it was possible to create the previous scenes of the 1955
"Canadian" on the western portion of the Laggan Subdivision. I discovered a
web page at the MSTS web site which described how to vary the camera position from the
defaults supplied with the MSTS software. The following explains what I learned in the
process of trying their suggestions.
Configuration File
The position of the camera, ( There is no camera as such but it is a point in
space from where a scene is viewed. ) is set to certain parameters when MSTS is
started. The MSTS web site explains, only partially, how to change these settings.
When the MSTS program starts it reads a configuration file named
"camcfg.dat" stored on the hard drive with the MSTS files. It is located in
a folder named "Global" which in turn is located in another folder named
"Train Simulator". If you installed MSTS to the default
folder, the full address looks like this:
"c:\Program Files\Microsoft Games\Train Simulator\Global\camcfg.dat"
Now, before you jump in and make any changes to this file, make a back up copy. You
WILL make mistakes, but don't let that stop you. With a copy of that original file
you can restore everything to its original condition.
When you read the contents of the file don't be too intimidated by what you see.
It is divided into several logical groups. Each group controls a particular camera. I
only experimented with cameras 2 and 3.
Standard Camera Controls
Just to refresh your memory here are the keys you would press to select a
particular camera.
- Key 1. Cab view;
- Key 2. Leading unit or engine;
- Key 3. Last car in train;
- Key 4. Varying positions on the ground in front of the train;
- Key 5. Inside a car looking out the window.
This is the basic list. Additionally you may look out the right side cab window and
rotate cameras 2, 3, and 5. Cameras 2 and 3 also permit you to zoom in or out.
What you can't do with the default controls is change the starting position of the
camera, either the left/right position, height, or distance from the subject
( train ). Here's a section on how to zoom the camera followed by an explanation of
how the offset parameters function:
Camera Zoom
The MSTS web site page on camera position explains the effect a different focal
length lens will have ( the zoom factor ) on what you see on your screen. They call
this the "FOV" value for "Field of View". By changing the FOV
value contained in the camcfg.dat file you change the zoom factor for a camera.
Here's their chart of equivalent values:
Lens mm
|
FOV value
|
20 mm
|
84
|
28 mm
|
65
|
35 mm
|
54
|
50 mm
|
40
|
85 mm
|
24
|
105 mm
|
24
|
135 mm
|
15
|
200 mm
|
10
|
Note: The 85mm and 105mm have the same value. I can't explain this, perhaps
it's an error on their web page.
With the distance between the camera and subject unchanged here's what changing the
FOV value will do:
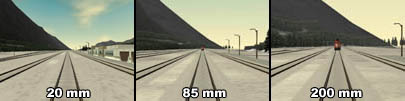
CameraOffset ( 0 0 375
)
FOV 84
|
CameraOffset ( 0 0 375
)
FOV 24
|
CameraOffset ( 0 0 375
)
FOV 10
|
So... using the chart above simply substitute the numerical value in
brackets next to the letters "Fov" in the camcfg.dat file to adjust the
camera's zoom factor. ( See the example of the camcfg.dat file below. )
Camera Offset
While the MSTS web page does a good job explaining how the zoom works they
neglect to explain how the CameraOffset values function. Things get a little trickier
when it comes to camera offset. Let's take a look at the camera 2 default values in
the camcfg.dat file, now called "CamTypeFrontTracking":
camera ( CamTypeFrontTracking
CamType ( CamTypeFrontTracking CamControlTethered )
CameraOffset ( -12.8 15.6 -45.7 )
Fov ( 60 )
ZClip ( 0.5 )
WagonNum ( 0 )
Description (Tracking_Cam_1)
)
|
But what do the numerical values in "CameraOffset ( -12.8 15.6 -45.7 )"
represent?
Offset - Through trial and error I've discovered the first, ( -12.8 in the
camcfg.dat example above ) is the angle the camera is offset from the centerline of
the track. A positive value moves the camera to the right side of the train ( The
right side is defined from the position of standing at the rear of the train and
looking forward. Canadian locomotives are lettered FR and FL to indicate Front Right
and Front Left, this method of identification matches, coincidentally. ), a negative
value moves the camera to the left side of the train. This is applicable to cameras 2
and 3. Changing the numerical value can look like this:
CameraOffset ( 0 0 20 )
FOV 60
|
CameraOffset ( 10 0 20 )
FOV 60
|
CameraOffset ( -10 0 20 )
FOV 60
|
Height - The second value ( 15.6 in the camcfg.dat example above ) represents
the height of the camera's position. Zero appears to be about 10 feet above ground
level when the surface is flat such as Field yard. Zero marks the starting value with
positive numbers raising the camera while negative values lower it. If you move the
train, and the ground suddenly began to rise beneath the camera position, the camera
position also rises. This makes sense when you think about it but it can be
frustrating when you save a train's position then reload it only to find the camera
position suddenly shifted higher. When the camera is above a particular surface, using
a negative value will NOT lower the camera below that surface. If the camera were
positioned over, say a ditch, then the negative value you supply WILL lower the
camera. Changing the numerical value can look like this:
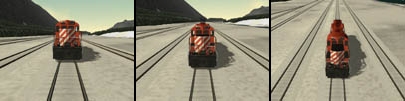
CameraOffset ( 0 0 20 )
FOV 60
|
CameraOffset ( 0 5 20 )
FOV 60
|
CameraOffset ( 0 10 20 )
FOV 60
|
In the three images above any negative amount below zero would have no
effect. The camera can't be positioned any lower than approximately 10 feet above
ground level as shown on the leftmost image. Therefore, a camera held at waist height
is not possible at most locations.
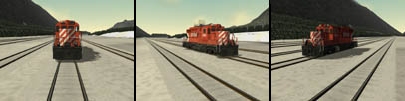
Distance - The camera will focus about the center of a selected locomotive
or car. To move away increase the third value ( -45.7 in the camcfg.dat example above
), to move closer decrease the third value. A positive value moves the camera towards
the front of the train, a negative value towards the rear. Changing a positive
numerical value can look like this:
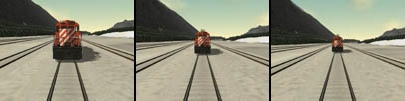
CameraOffset ( 0 0 20 )
FOV 60
|
CameraOffset ( 0 0 30 )
FOV 60
|
CameraOffset ( 0 0 40 )
FOV 60
|
Perhaps the following three images will help you visualize the effect of changing the
numerical values in the camcfg.dat file:
Once you've read the preceding you may be tempted to try and make some changes
to the camcfg.dat file. So how do you change the camcfg.dat file? MSTS states you may
use a simple text editor program. I first tried using the "Notebook" program
that comes with Windows 98 but it doesn't work. Using the "WordPad" program
does. Just ensure you save the camcfg.dat file as a "Unicode Text Document".
There is a drop down menu selection in the "Save As..." dialog box
below the file name where this must be selected.
Bring along plenty of patience when you try this.
You now know enough to be
dangerous... good luck !
Associated Links
Microsoft Train Simulator
Maple Leaf Tracks
Harold Clitheroe
Train-Sim.com
Train Artisan
3D Train Stuff
Railway Station.com
Train Simulator Fan Site
RailDriver
©
2005 William C. Slim
http://www.okthepk.ca
|